Time to get to the nuts and bolts of a server-side rendered application. As we've discussed, the high-level story goes something like this:
- An end-user visits your application (i.e. they go to
https://WhateverYourDomainNameIs.com/SomePath) - That request is received by your web application, and it figures out what the appropriate response is (i.e. what HTML to send)
- The response is sent back over the wire and is received by the web browser, which then shows it to the end-user
Let's take each one of these steps and peel back one layer of the technical onion, so that we can take a deeper look.
URLs, Host Names, and Paths, oh my!
As an end-user of the web, you see this every day, and probably don't even think anything of it. But that address that sits in your web browser's address bar? That's the URL (Uniform Resource Locator) of the content you're looking at. The "locator" part of URL means that, in theory, every unique URL should produce a unique result, and the URL is simply a means for providing the location of that result. For example (again, in theory), these two different URLs should produce a page for books and a page for shoes, respectively:
https://YourDomainName.com/books
https://YourDomainName.com/shoes
Furthermore, books is the resource you'd expect to find at the first URL (in other words, you'd expect to find a page about books), and shoes is the resource you'd expect to find at the second URL. Uniform Resource Locator.
And, the uniform part refers to the fact that they all look the same:
- The Protocol – https or http
- Followed by the "colon-slash-slash"
- Followed by the Host Name – YourDomainName.com
- Followed by the Path – /books or /shoes
For the purposes of this lesson, we're going to concentrate on the path, much more than the other pieces. The protocol is always going to be https and the domain or host name is going to be given to us by Ona while we're developing our application. We'll learn about domain names and how to use them in a later lesson. For this reason, we'll refer only to the path (e.g. /books) instead of the full URL from now on.
It turns out that Rails is tailor-made to help us write these resource-based applications. In fact, Rails assumes that the main thing you want to do is build an application that is a collection of things to CRUD. This is super-important, so let's make a mental note of that for later – but for now, let's see how we can use Rails to create our first server-rendered HTML page!
Starting Fresh
Let's spin up a new Rails application on Ona so we can get coding. Head over to https://github.com/entr451-winter2026/web-apps and "Use this template" to create a new repository in our personal GitHub account – call it my-first-app. Then, open the code in Ona.
We're going to see that there are a lot of folders and files. Don't be intimidated – we're not going to use them all, and in fact, if we know exactly where things go, it's really quite straightforward.
The first thing to do is decide what our first resource will be. What will be the subject of our first page? Naturally, it will be a page about tacos.
Our first step is to tell our Rails application that we want to build a page about tacos – that is, that our app contains a resource named tacos. We do this using the routes file – which is located at config/routes.rb. Let's open it up and have a look; ignoring the comments, the file looks like this:
Rails.application.routes.draw do

end
To let Rails know about our tacos resource, we add a single line to the file:
Rails.application.routes.draw do
  resources "tacos"
end
And we're done with that. Our application is now configured to have a /tacos path.
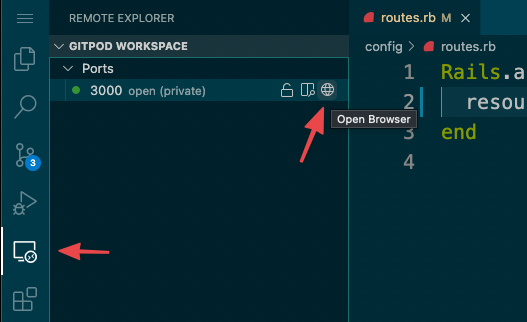
Let's fire up our Rails application and see what we've got! Let's hop into the Terminal (View -> Terminal in Ona, if it's not already open) and issue the following command:
rails serverWhat does that do? It executes the software application needed to serve up HTML pages from our Rails application! We should see a bit of terminal output, letting us know that the server application is now running, and to hit CTRL-C if we want to terminate the application and return to the normal Linux command prompt.
We're also going to a see a small window pop up in the corner, telling us that a service is available on port 3000. We can hit "Open Browser" from here to open a new tab containing the results of our application. If that pop-up goes away too quickly, or if it doesn't appear, we can do the same thing by clicking on the "Remote Explorer" (the fifth icon from the top in the left-hand sidebar) and then clicking the "Globe" icon.
From there, if everything went smoothly, we should see a fairly generic-looking page letting us know that our Rails application is running:
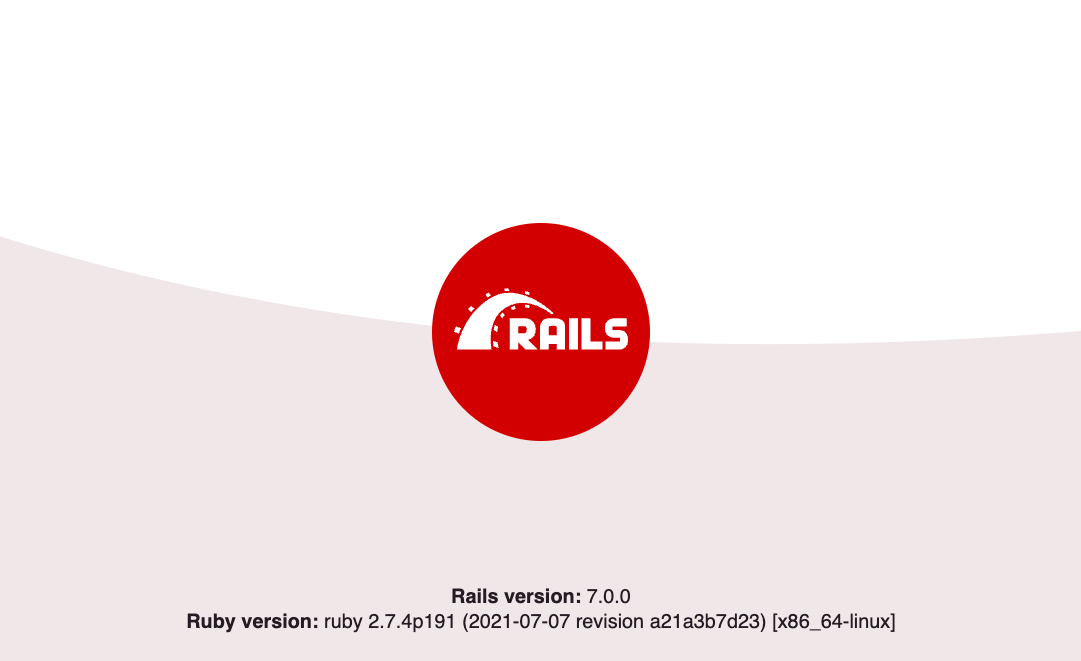
We should also notice that the web address for that page is rather long – that is the temporary domain name that Ona has issued us, for the purposes of developing our application.
Ok – enough with the setup – let's get to that page about tacos!
Don't Fear the Error
Let's go to /tacos to see the results of adding our tacos resource to our routes file! Uh-oh, looks like that produces an error:
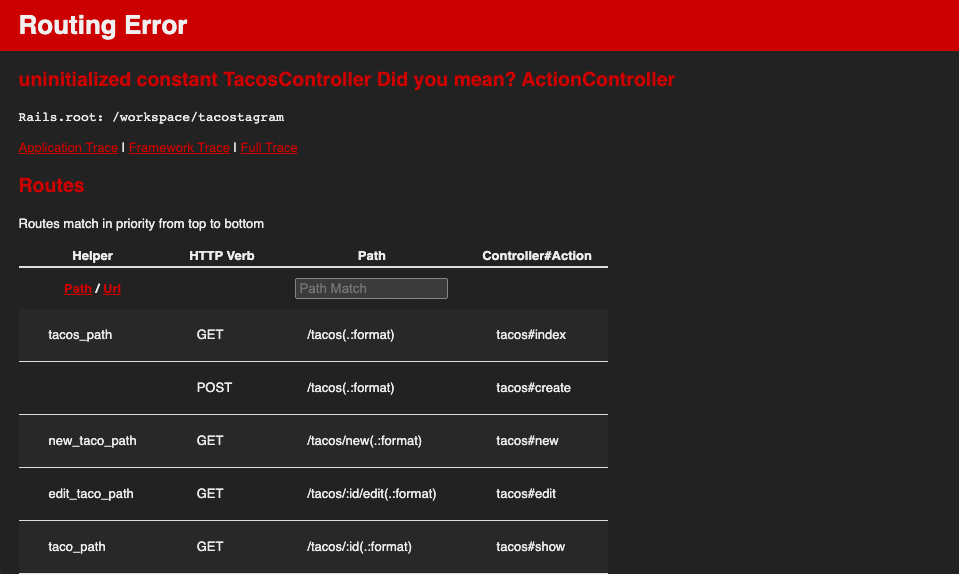
As we can see, error messages in Rails are quite loud and scary. But don't be afraid of errors. Error messages are there to help us. As a matter of fact, error messages often tell us exactly what we need to do to fix problems in our code – we just have to stop and read them.
In this particular case, the primary error is uninitialized constant TacosController. Since this our first time through the Rails universe, we didn't know that the next step needed, after creating our resource in our routes file, is to create a controller for that resource. But, the error message tells us that's exactly what we need to do. From our Terminal prompt, let's hit CTRL-C to stop the server application, then issue the following command:
rails generate controller tacos
That's going to see some output in the Terminal:
create  app/controllers/tacos_controller.rb
invoke  erb
create    app/views/tacos
That's just letting us know that a couple of files/folders were created. We'll get into the controller itself in a future lesson, but for now, our controller is created and we can move on. Start up our server again with rails server – and refresh the browser tab containing our application.
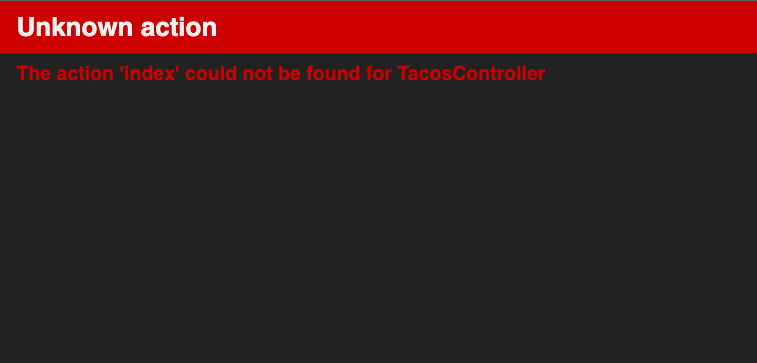
Another error! But we're not afraid. This one is a bit cryptic, and will make more sense later, but essentially this error is telling us that we need to have some output for this tacos resource, but we haven't created any yet. Fortunately, doing so is easy! In the File Explorer in the left-hand sidebar, find the app/views/tacos folder and create a file called index.html.erb. Of course, we could also use the command prompt to do so, with touch app/views/tacos/index.html.erb. Now, refresh the page again.
Such emptiness! But this is great – because there are no more errors! In fact, the only thing left to do is to fill the index.html.erb file up with HTML. Open up the file and plug some in:
<h1>I love tacos</h1>
<p>There are so many kinds of tacos:</p>
<ul>
  <li>Carnitas</li>
  <li>Al Pastor</li>
  <li>Steak</li>
  <li>Fish</li>
</ul>
Refresh our page again, et voilà!
Something to Notice – The Application Layout
Let's view the page source of the page we just created at the /tacos path. We can do that by right-clicking anywhere on the page and selecting View Page Source (in Chrome). We'll find that the generated HTML page looks something like this:
<!DOCTYPE html>
<html>
  <head>
    <title>StarterApp</title>
    <meta name="viewport" content="width=device-width,initial-scale=1">
    <meta name="csrf-param" content="authenticity_token" />
    <meta name="csrf-token" content="..." />
    <link rel="stylesheet" href="/stylesheets/application.css" />
  </head>

  <body>
    <h1>I love tacos</h1>
    <p>There are so many kinds of tacos:</p>
    <ul>
      <li>Carnitas</li>
      <li>Al Pastor</li>
      <li>Steak</li>
      <li>Fish</li>
    </ul>
  </body>
</html>
Whoa! Where did all that HTML come from? We only typed the stuff inside the <body> element – where did the other stuff come from?
By default in Rails, we only have to put the stuff that goes inside the body element into our view files (everything in app/views). The outer shell of the HTML actually comes from the app/views/layouts/application.html.erb file – the application layout. Using the same common layout, or outer wrapper HTML like the DOCTYPE, html and head elements, is such a common task in web development that Rails ships with it out-of-the-box.
Of course, that was still a pretty long path to getting to essentially the same result as a simple HTML page. But we've now done so in a way that all the pieces of the infrastructure puzzle are set up – we are now ready to harness the power of combining the technologies we've learned about so far, which is what we'll do in the next lesson.